Creating a Google Dynamic Search Ads Campaign using a VIN IQ optimized inventory feed
Important Note: When using a VIN IQ Feed, we strongly recommend creating a brand-new Dynamic Seach Ads (DSA) campaign by following the guide below. DO NOT link the VIN IQ feed into a previously created campaign. The VIN IQ feed is specifically designed to work seamlessly with a DSA campaign.
If you have any questions about these instructions please contact “support@viniq.io”.
Step by Step Instructions for Setting Up a Google DSA Campaign Using a VIN IQ Feed
Inventory feed
Important Note: You will need to have a feed in order to launch your Google Dynamic Search Ads Campaign. The feed can be directly ingested by VIN IQ into your Google Ads account or you can upload one manually using our feed URL.
If you’re not sure or you don’t have a feed, please stop here and contact “support@viniq.io”.
A. Direct launch integration
In this configuration, VIN IQ will automatically launch the DSA feed into your Google Ads account. There is no need to manually set up the feed.
Please jump to step C. Create Your Search Ads Campaign.
B. Manual Feed Configuration with Feed URL
To begin, log into your Google Ads account.
1. Click on Tools in the left side menu of the Google Ads User Interface.

2. From the menu that appears select Business Data.

3. Ensure that the Data Feeds tab is selected on the top left corner.

4. Click the "+" button to create a new Data feed.

5. From the menu that appears, click Page Feed.

6. You will now provide a name for this feed. Be sure to use a descriptive name that will be meaningful to you in the future. Also, consider that you might end up with many feeds so ensure you describe this feed clearly. For example, you could name the feed VIN IQ-DSA-USED.

7. Next, you will Select a source link for Google to process.
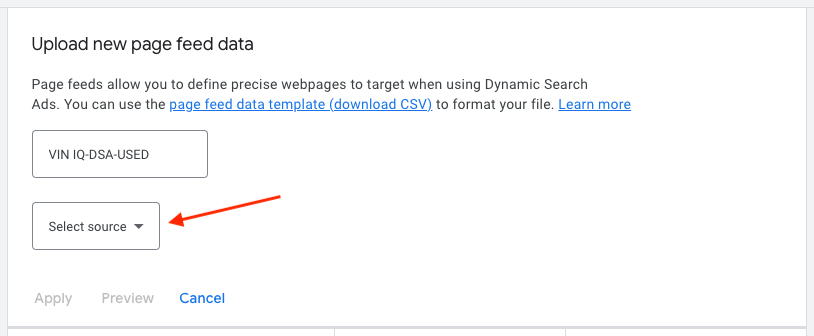
7. In the following Select Source section, select HTTPS.

9. Some input fields will appear. You will need to populate the Source URL.
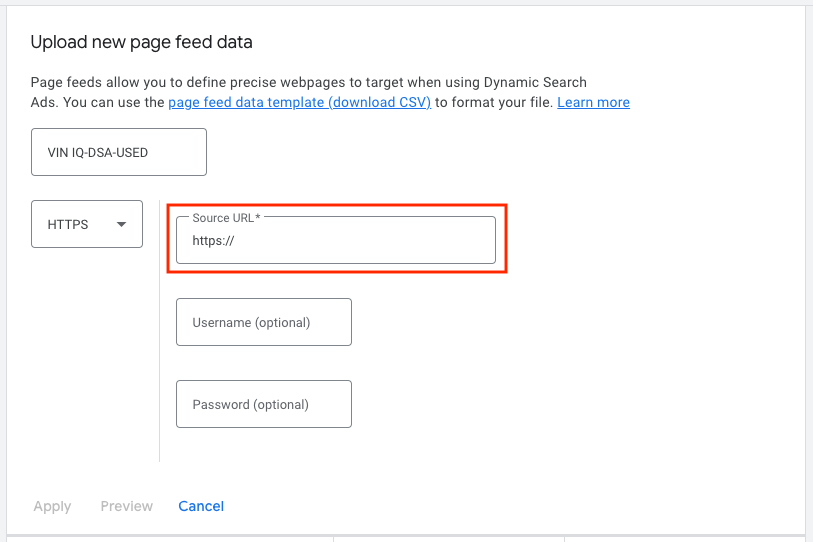
10. The feed URL was provided to you by the VIN IQ CS team. It should look like this: “https://app.viniq.io/feeds/25103/25103.659eb337bd4d2659eb337bd4d5436209.csv”
11. Paste the link into the Source URL field in Google Ads.

12. You can leave the Username and Password fields empty as they are not required. You can click Apply to save the file.
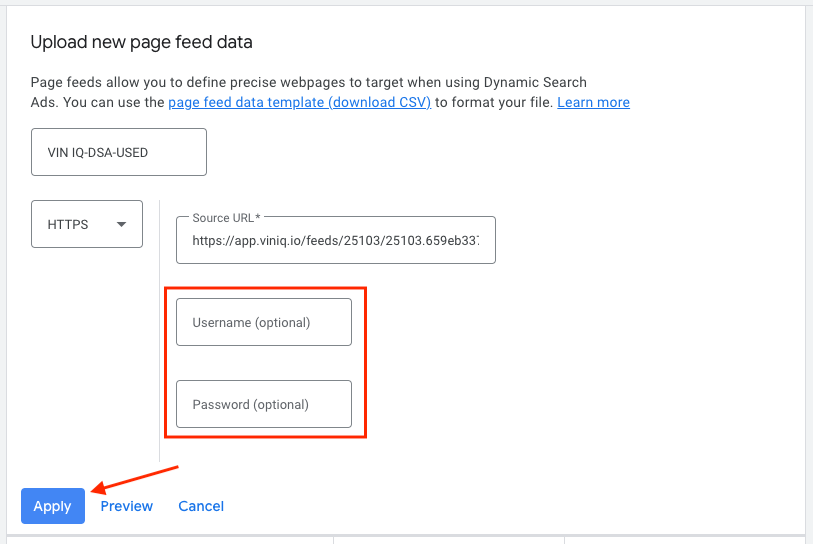
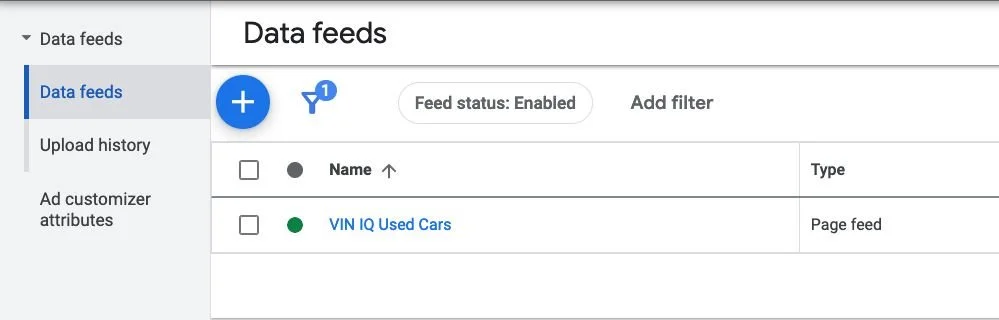
13. After you click Apply your file will be uploaded and processed. After a few moments, you should see your feed listed from the main Data Feeds screen.
Schedule Automatic Updates to Your Feed
At this point, you should still be within the Business Data section of your Google Ads account.
14. If you are not, navigate to Tools, then Business Data from the main menu at the top of your Google Ads account screen.

15. To schedule your feed, first, click the name of your feed to access its settings.

This screen will load a preview of the data in the feed file.
16. Next click Schedule from the menu that appears.

17. Since you will not yet have any schedules created for this feed, click the New Schedule button with the blue plus icon located in the middle of the screen.

18. From the Select Source drop-down menu, choose HTTPS.

19. In the form that appears, you need to again populate the Source URL with the VIN IQ file link (e.g. “https://app.viniq.io/feeds/25103/25103.659eb337bd4d2659eb337bd4d5436209.csv”).
20. Paste that value into the Source URL field in the Google Ads Schedule form.
From the Frequency pull-down menu, choose Every 6 hours. You can leave Username and Password blank.

21. Click on Save.

C. Create Your Search Ads Campaign
1. Return to Google Ads home screen by clicking the Google Ads logo at the top left of the screen.

2. Make sure the Campaigns menu item is selected on the left menu and click the Blue Plus icon.

3. Select New Campaign from the options that appear.

4. From the Campaign Objective screen, choose the bottom right option to Create a campaign without a goal's guidance.

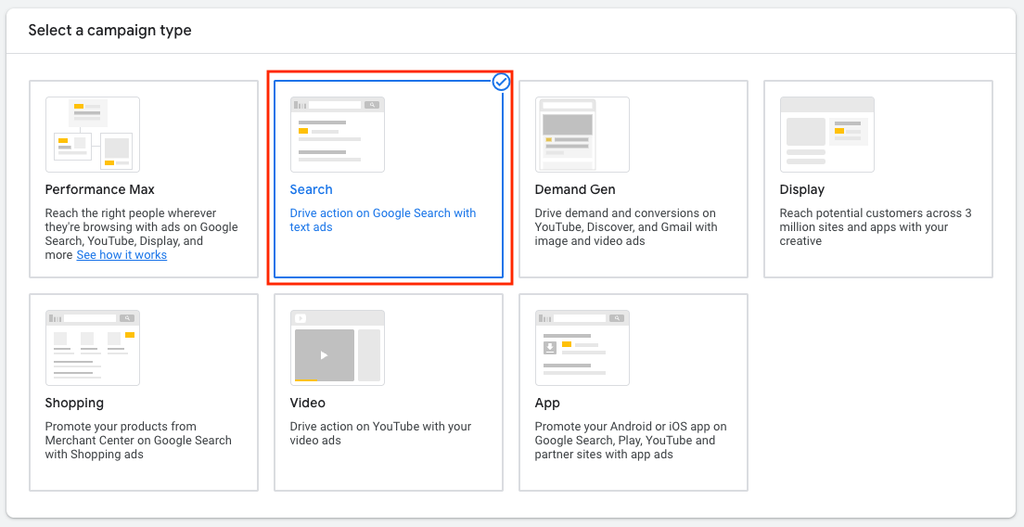
5. From the Campaign Type screen, choose the Search option.
6. At this point, depending on your Google Ads account configuration, you may be prompted to choose Conversion Goals. You can choose your desired Goals and then click Continue to proceed.

7. Next you will be asked to select the results you want from this campaign. Choose Website visits and enter your website address into the field that appears and then click Continue to proceed.

8. Now enter a name for this campaign and click the blue Continue button. The name should be descriptive of the campaign, e.g. VIN IQ - DSA - Used.

9. You are now prompted to enter Bidding details. Choose the settings that are appropriate for your goals, then click Next.
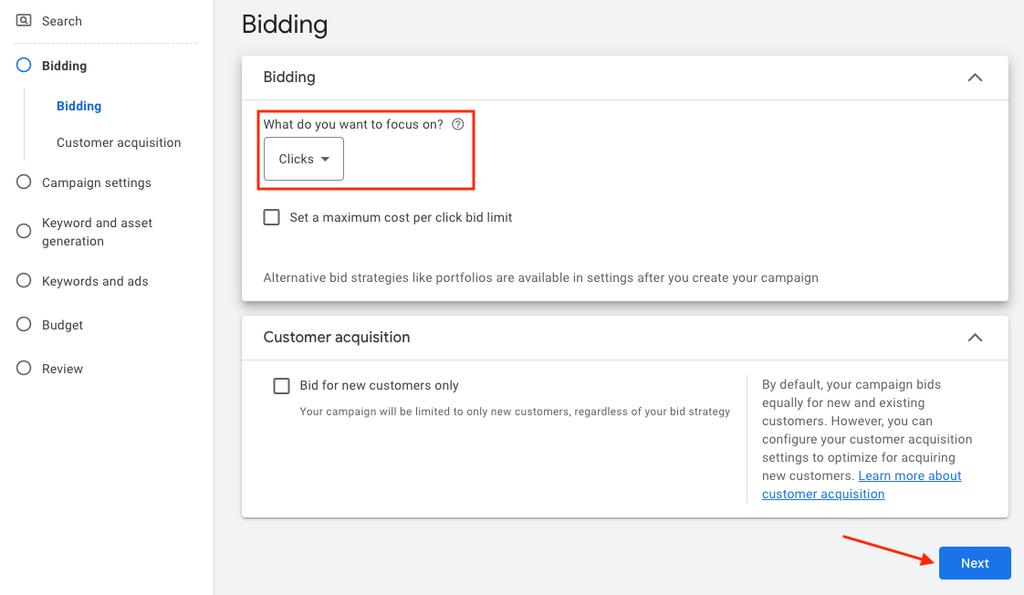
There are several options that can be configured according to your dealerships preferences. Some of the settings such as Budget and Bidding will vary by your individual goals and needs.
10. Under Campaign Settings choose the Search and Display options that appear. Make sure that Google Search Partners Network is enabled. Google Display Network is optional.

11. Under Locations, select Enter another location and click on Advanced search.

Here we recommend you target a 25 miles radius around you dealership’s location. Click Save.

12. Complete Languages and Audience segments options as desired for your goals.
13. Under Automatically created assets make sure to turn this to OFF.

14. Below Automatically created assets, click on More settings to configure your UTMs.

15. Click on Campaign URL options to configure your tracking UTMs.

16. In the Final URL suffix field you can enter the desired UTM values for Source, Medium, Campaign etc.
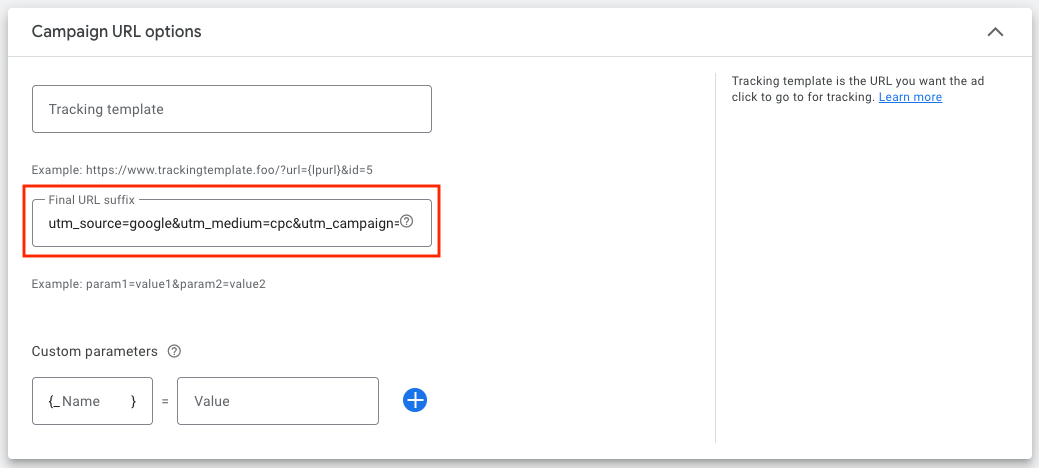
While you can enter any values you wish as UTM tracking parameters, typical examples will be descriptive of the source (Google) and the medium (cpc). However, in order to clearly see this traffic versus other similar source traffic, ensure to add the utm_campaign parameter to make a distinction from other similarly running campaigns.
Example: utm_source=google&utm_medium=cpc&utm_campaign=viniq_dynamic_feed
17. Click Next at the bottom to proceed.

18. In the Keywords and asset generation section you can click Skip.

19. Under Keywords and ads just skip this section by clicking on the dustbin icon in the top right corner. Instead, we’ll need to set up a dynamic ad group to build dynamic ads later on.

20. A pop-up will show up, click on Yes, remove.

21. Now, on the left side menu, click on Budget to proceed.

22. Configure your budget and click Next.

23. Now you will review your campaign. The UI will prompt two issues at the top, however that is OK. You will configure your ad and ad group after the campaign is published.

24. Review the campaign settings and click on Publish campaign. You will likely get a message from Google about the campaign needing ads to serve, but ignore this and Publish the campaign anyway.

25. You might be prompted to install the Google tag, you can also ignore this step. Click on the Google Ads logo in the top left corner to go back to the Google Ads home screen.
26. The campaign setup is not fully complete yet. On the left side menu click on Campaigns, and select the campaign that was just published and go back into the campaign settings.

27. Click on Additional settings at the bottom of the menu.

28. Expand the Dynamic Search Ads setting to configure your website and feed.

29. Type your website and select Use only URLs from page feeds

30. Type your website and select Use only URLs from page feeds. From the list of feeds that appear, choose the one you recently configured in the previous steps. Click Save.

31. You have now connected your feed to your campaign. Google will use the inventory in the feed to create ads that will become part of the ad groups' ad content. The final step is to create your Ad Group and Dynamic Targets that will instruct Google on which inventory to use from the feed as the vehicles change with each feed update.
Create Ad Groups and Dynamic Targets
Now that the Campaign is created, we will create the Dynamic Ad Group.
32. By clicking on the name of the campaign that was just created you should be redirected to the Ad groups section on the left side menu.

33. Click the Blue Plus icon to create a new ad group.

34. On the menu that shows up change the Ad group type from Standard to Dynamic, and click Continue.

35. Enter a suitable name for the Ad Group.

36. In the Custom labels section, we will instruct Google to use custom labels from the feed to choose which vehicles should be active.
37. Under the heading Custom labels from the feed, enter the word active in lowercase into the field labelled “Enter a custom label” then click the Add button.

38. The active Dynamic ad target will move into the table at the right.

Important: It is critical that you enter the word active in lowercase without any whitespace characters before or after the word, otherwise, Google will not identify any vehicles to serve. Double-check that you have entered active correctly before proceeding to the next step.
39. Click Save and Continue.

40. You will be prompted to Create Ads. A Dynamic Seach Ad option should be selected at the top.

41. You need to create two ad descriptions that will appear at the bottom of your ad. Create them according to your dealership’s needs and preferences. The rest of the ad text will be dynamically generated from the vehicles in the feed.

42. Click Done.

43. Your dynamic search ad will appear at the top. Click Save and continue.

44. You have completed the setup for this Dynamic Ad Group.
45. Now your campaign has been fully configured with the ad group and dynamic targets. Your ad will be reviewed by Google and your campaign will be eligible to serve once it’s approved.