Creating a Facebook Automotive Inventory Ads campaign using a VIN IQ optimized inventory catalog
Important Note: When using a VIN IQ Feed, we strongly recommend creating a brand-new Facebook Automotive Inventory Ad campaign by following the guide below. DO NOT link the VIN IQ feed into a previously created campaign. The VIN IQ feed is specifically designed to work seamlessly with an automotive inventory campaign.
If you have any questions about these instructions please contact “support@viniq.io”.
Step by Step Instructions for Creating a AIA Campaign Using a VIN IQ Feed
Create a Campaign
To begin, log into your Facebook Business account.
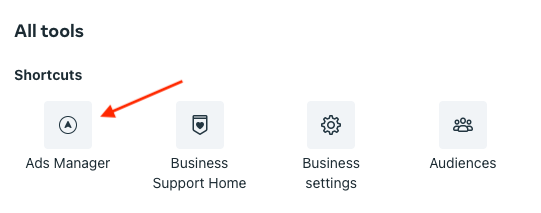
1. At the top left of the screen, click the hamburger menu (the menu with 3 lines) to access All Tools.

2. Choose Ads Manager from the menu that appears.
3. Click the green Create button.

4. The Create new Campaign dialog appears - choose the Traffic option under campaign objective. Click the blue Continue button.

5. A pop-up will show up. Select Manual traffic campaign and click Continue.

6. In the Campaign Details section - populate the Campaign Name and choose the campaign’s Category.

We advise you to select Financial products and services (formerly Credit) as the ad category, choose the country in which you are running the ads since there are different requirements per country.
If you're running automotive inventory ads, it's strongly recommended to select "Financial products and services" as your ad category.
This helps prevent Facebook from rejecting your ads due to credit-related content (like financing or lease offers) found on your website—even in hidden code or menus.
Failure to select the correct category can lead to repeated ad rejections, account review delays, and potential suspension.
Refer to Facebook’s Ads Terms & Conditions or contact your Meta Marketing Pro Specialist for more details.
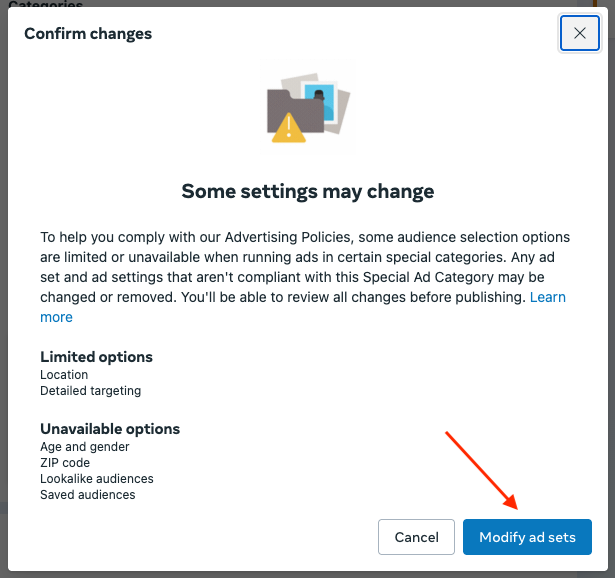
7. After selecting financial products as the ad category you might see a warning to review and update some audiences setting. Click Review Special Ad Category updates.

8. Here you will be asked to confirm the changes. Click on Modify ad sets.
9. In the Budget section, enter your desired budget options and campaign bid strategies. click the blue Next button.
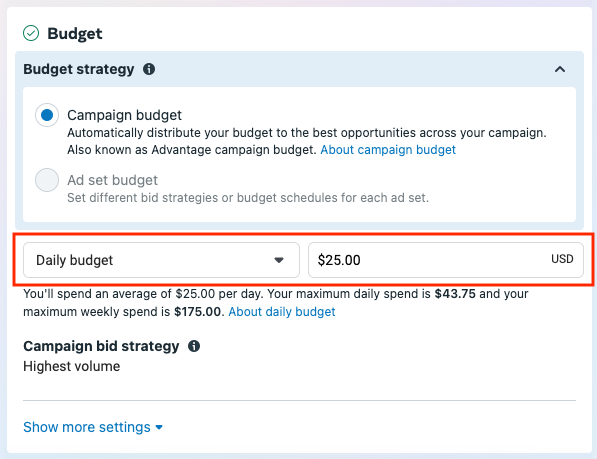
Click the blue Next button at the bottom right corner.

Create an Ad Set & Ad
The next step is to configure an Ad Set and Ad.
10. You should now be viewing the Ad Set configuration screen. Enter a Name for this Ad Set that describes the ad(s) you plan to include in this group. Then choose Website from the Conversion options.
Under Performance goal, we suggest to select the Maximize number of link clicks.

11. Scroll down to the Budget & schedule section and choose the options details suitable for your campaign.

12. Under Audience you can selected the targeting config for your campaign. As a default, we advise to target a 25 miles radius around your dealership address.

13. You can leave the Placements setting as is, targeting all placements. Click Next to proceed.

14. You should now be viewing the Ad configuration screen. Enter a Name for this ad that describes the Ad. Then choose the Facebook Page and Instagram account from the Identity section.
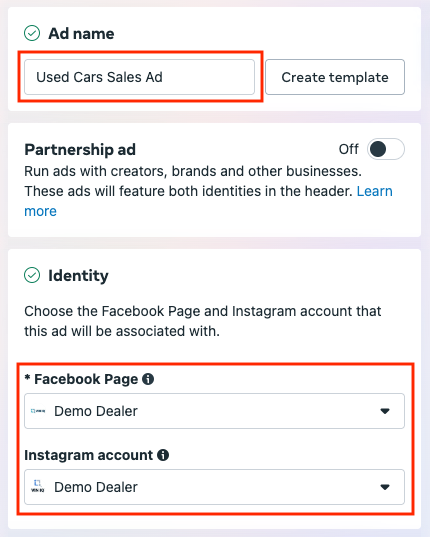
The Facebook Page you choose here must match the page whose Page ID you provided to configure the VIN IQ feed. If the Page IDs do not match, the feed will not be eligible for linking to your Ad.
15. From the Ad Setup section, choose Advantage+ create ads under Media setup and Carousel from the Format options.

16. Under Destination, choose Website and select Override catalog website deep links. Pay attention to the Set catalog deep links field where you must choose the URL from the plus menu. After choosing the URL option, the vehicle.url item appears in the field.

Click the blue Aa link next to the vehicle.url and choose only Use catalog format from the menu.

Additionally, fill out your dealership page under the See more URL.

17. Scroll down to Ad sources section and choose the Catalog you created earlier. Leave Vehicle Set as All Vehicles as VIN IQ will adjust the vehicles every hour.

18. Under Ad creative, select Slideshow. For the Headline field click the plus button and select Title. For the Description click the plus button and select Price.

You can select any item as you Call to active, but we suggest to choose Shop now.

19. In the tracking section, choose to enable Website events if you have a Facebook pixel deployed on your website. Also do not forget to populate the URL parameters to pass custom UTM codes to Google Analytics and track this separately from other Facebook campaigns you may be running.

While you can enter any values you wish as UTM tracking parameters, typical examples will be descriptive of the source (facebook) and the medium (cpm). However, in order to clearly see this traffic versus other similar source traffic, ensure to add the utm_campaign parameter to make a distinction from other similarly running campaigns.
utm_source=facebook&utm_medium=cpm&utm_campaign=viniq_used
20. Click the green Publish button to publish your ad and activate your campaign. This will publish the ad and it will automatically be set to Review status. After a short period, the ad should be approved and switched to Active status.
You have completed the final step in setting up your Facebook Automotive Inventory Ads using a dynamic inventory feed!