Sharing Google Merchant Center Access
Sharing access to your Google Merchant Center account is necessary for VIN IQ to be able to create a Google Ads VLA campaign.
You need 3 separate accounts to show your vehicle ads: a Merchant Center account and a Google Ads account, as well as a Google Business Profile.
This guide assumes that a Google Merchant Center, Google Ads and a Google Business Profile account have already been set up for your business.
Two steps are needed to fully integrate VIN IQ to create a VLA campaign.
B. Sharing your Google Merchant Center Account ID and Google Business Store Code
If you recently created a brand-new Google Merchant Center account you need to follow these additional steps.
C. Link your Business Profile and Merchant Center
A. Sharing access with VIN IQ
Sign into your Google Merchant Center.
Once signed in, ensure that the correct Merchant account has been selected in the top navigation bar.

3. In the top navigation bar, navigate to Settings > People and access.

4. Under the People section, click on Add person.

5. Share access with the account we gave you (either merchantcenter2@viniq.io or merchantcenter@viniq.io), and click Next.

6. Under the access options, select Standard and Performance and insights.

7. Click the Add person button to share access.

8. This process is now complete.
B. Sharing your Google Merchant Center Account ID and Google Business Store Code
Finding your Google Merchant Center Account ID
9. Once you sign in to your Google Merchant Center Account, the account ID is located in the URL in the navigation bar.

10. Your ID is the number combination after the “a=”.
11. Copy that number combination. You will need it later to send it alongside your store code to the VIN IQ Customer Support team.
Finding your Google Business Store Code
To find your Store Code in your Google Business Profile, you can follow these steps.
12. Sign in to your Google Business Profile Manager.
13. Once you're signed in, you'll see a list of your business locations.
14. Your Store Code (or Shop Code, as Google uses them interchangeably) can be found near your location name.

15. If the Store Code is not listed in this view, click on your business name.

16. Click on the three vertical dots, then on Business Profile settings.

17. Click on Advanced settings.

18. Scroll down to the Shop Code section.

19. You’ll find your Shop Code/Store Code there (remember that Google uses these terms interchangeably). A Store Code is not only alphanumeric, it can be a combination of numbers and letters that you previously created. Copy that number combination.
20. If you're unable to find your Store Code using these steps, you can try looking for it in the confirmation email you received when you first verified your business on Google Business Profile.
21. Now that you have your Merchant Center Account ID and Google Business Store Code you need to send them to our VIN IQ Customer Support team at “clientcare@viniq.io”.
If you recently created a brand-new Google Merchant Center account
You need 3 separate accounts to show your vehicle ads: a Merchant Center account and a Google Ads account, as well as a Google Business Profile.
C. Link your Business Profile and Merchant Center
1. In your Merchant Center account, click the tools and settings icon.

2. Select Apps and services.

3. Click the Add services button.

4. From the options, select Google Business Profile and click Next.

5. If your email address is listed, select the correct one and follow the next prompts.
6. If your email address isn't listed, enter the email address that's associated with your Business Profiles. Click Next.

7. Verify if that’s the correct email and click Send request.

8. Merchant Center will automatically request and approve the linking if you are both an administrator or standard user in your Merchant Center account as well as a manager or owner of your Business Profiles.
9. To verify that the linking was approved automatically, you might have to refresh your page.

D. Link your Google Ads account to Merchant Center
Before you start, be aware of your Google Ads ID. It's the 10-digit number in the top right corner of Google Ads (xxx-xxx-xxxx).
1. In your Merchant Center account, click the tools and settings icon.

2. Select Apps and services.

3. Click the Add services button.

4. Select Google Ads and click Next.

5. Next, you will have the option to create a New account or link to an Account you don’t manage (with your pre-existing Google Ads ID).

6. If you want to create a new account, select that option, click Next to follow the prompts.
7. If you already have a Google Ads account, select Account you don’t managae and paste your 10-digit Google Ads ID. Click Next.

8. Verify if your Google Ads account is correct and click Link.

9. The link request will need to be approved by a Google Ads account admin.
Approve Link Request in Google Ads
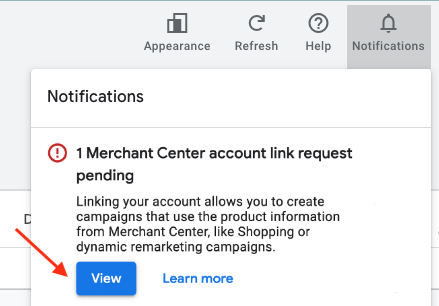
10. Sign in to your Google Ads account.
11. Click the notification icon in the upper right corner, find the notification that reads “1 Merchant Center account link request pending”, and click View.
12. Find the Google Merchant Center account you want to link, and click Review.

13. On the next prompt click Approve.

14. A Successfully linked message should show up next confirming the process was successful.

15. If want, you can go back to the Google Merchant Center page, and refresh the page.
16. The Google Ads account will appear under service.

E. Enable the vehicle ads program
1. Sign in to your Merchant Center account.
2. In the top navigation bar, navigate to Settings > Add-ons.

3. Find the Vehicle Ads add-on and click Add.

4. The vehicle ads program should now be enabled.
5. The Add button can be greyed out if your account is missing any of the mandatory prerequisites.
